this part is about sonification, and about databending with audio software. i'll show you how to coax databent sounds out of your windows hard drive using a type of audio software called a wav editor. then, i'll give you some tips for using the wav editor to create databent images.
sonification, put simply, is the act of converting data into sound. wikipedia points to some well-known examples, such as the geiger counter and sonar. it's an extremely broad field; here i'll be focusing on sonification in a databending context, or using sonification techniques to create art.
my first exposure to databending came in 1995 or '96. i'd been using a tracker program called scream tracker to create music on my computer, but scream tracker used an obscure file format for its audio samples. i wanted to be able to record my own sounds and sequence them, so i switched to a program called impulse tracker. quickly i discovered that impulse tracker not only let me use wav files, but it let me open up any file on my hard drive as if it were a sound file, and then play and sequence the sounds. i was immediately hooked, and a couple years later i'd write & record an all-databending EP using impulse tracker: dissonance is bliss. obviously, i'm still databending today, though i've since moved on to other software.
techniques
if you have programming/software development skills, then the potential here is pretty limitless: you can sonify data in any way you can imagine. for the purposes of this primer, i'll be using off-the-shelf or freely available software.
one simple way to sonify data is to convert it to MIDI. MIDI (musical instrument digital interface) is a language that computers and synthesizers use to communicate with each other. if you're a musician who uses MIDI in your setup, you could use programs like GoMinimal!, Midifier, Midge, or GMC to generate an endless amount of "random" MIDI files. personally i've never had much use for MIDI, myself.
also, you can use programs like voice (and the java applet version) to "draw" sounds, somewhat similar to xenakis's UPIC system. and programs like metasynth and coagula can be used to do fun stuff like hiding pictures in your sounds to be viewable with a spectrograph. but these aren't exactly databending, at least not by my definition.
the unix and linux operating systems provide perhaps the easiest way to sonify data: piping data directly to the sound card.
if you're on windows, you can do something pretty similar using wav editing software, which is what i'll be focusing on for the rest of this post. i'll be using adobe audition for my screenshots, but these techniques should work with any windows wav editor (or at least every one i've tried). if you don't have a wav editor installed, goldwave has a good free demo, and i've heard good things about audacity, which is open source. [update: check the comments for more on making this work in audacity.]
opening files in a wav editor
a wav editor is an application for recording waveform audio. you can think of the waveform as being as being a digital representation of a sound wave. the wav format is at the center of windows audio—when you rip a cd to mp3, you're actually ripping it to wav first, and then encoding mp3s based on those wavs.
so how do you open a non-audio file using a wav editor? if you read part 1 of this primer then you may have already figured this part out. sonifying data in a wav editor is as easy as clicking "open"!
launch your wav editor. click the "open" button, or click the "file" menu and choose "open". the "open" dialog box will appear. as in part 1, the key here is the "files of type" setting at the bottom. in most applications, you want to set that to "RAW". (some applications will let you use "all files (*.*)"—including adobe audition, which is what i'm using for screenshots—but this won't work in many applications.)
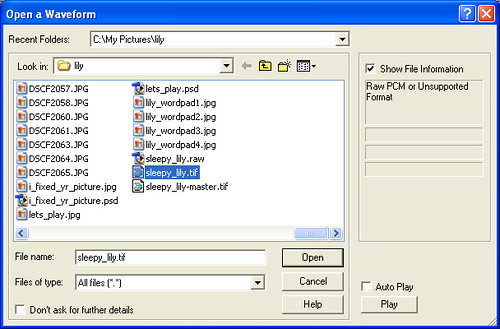
you should now be able to select any file on your hard drive. if your wav editor has a "preview" feature ("auto play" in audition), you may even be able to listen to your files without actually opening them up. but let's open a file to see what happens. select a data file and click "open". a dialog box will appear with settings for you to choose (which settings are available will depend on what software you use). adobe audition actually has two dialog boxes:
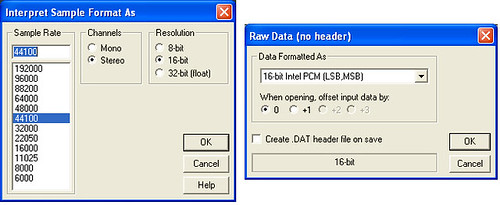
here, you can just accept the defaults, or play around with them. the settings you choose will affect what your file sounds like. for example, increasing the sample rate will make your sound shorter (faster) and higher in pitch; decreasing the sample rate will make the sound longer and lower.
once you've made your selections, click OK, and your data file will be converted into a waveform. congratulations! you can now resave your file in WAV format and do whatever you want to it: sequence it, run effects on it, whatever!
what data sounds like, and what data sounds good
patience is a virtue when it comes to databending. the range of sounds you can find are virtually limitless, but actually finding them will take time—your hard drive may have millions of files on it, so it will take time to find the best-sounding ones.
the types of sounds you're most likely to find are slightly distorted "electronic" sounds. if you're old (or unfortunate) enough to be familiar with the sound a dial-up modem makes as it connects to the internet, then you'll find a lot of sounds like that. databent sounds could also be compared to 8-bit or chiptune sounds.
so what types of data sound good when sonified? obviously, this is subjective, but here are some tips.
compressed files generally just sound like static or white noise. this is because of how file compression works: all the relevant data is smooshed together as much as possible, so any patterns in the original data are lost. if you're looking for white noise (maybe as a background texture, or maybe you just want a fraction of a second to create hihat-like sounds with), they're great, but they're generally not of much use to me. examples of compressed files include ZIP, tarball, RAR, cabinet files (CAB), as well as compressed image formats such as JPG and PNG. also, most video file formats are compressed.
small files become really short sounds—percussive sounds or clicks. this is obvious if you think about it: a cd-quality sound file uses 44,100 samples per second for each channel (stereo sounds have two channels), so that's a lot of data just for one second of sound.
uncompressed image files including bitmaps (BMP, most TIF), photoshop and image-editor-native formats (PSD, RAW, etc) can be a source of all sorts of interesting sounds.
executable files (EXE, etc) sometimes sound good, or sometimes sound like compressed files—just a bunch of static.
one of my favorite files to listen to are soundfont files (SF2). these files are included with some sound cards to help replicate music and sound effects. each file is basically a bunch of audio samples one after the other—often in different pitches—so when you listen to them consecutively they sound like musique concrete. (for an example, all the background loops on the animals within animals track "this isn't newsworthy" are from a soundfont file, though some of them have been processed. also, all the "bent" ringtones on the bad taste ringtones page are from soundfont files.)
these are just some ideas; there are thousands of different file formats out there, created by all sorts of programs, and you may have something amazing on your hard drive that i've never heard of. as i said before, finding great sounds requires lots of patience.
for a taste of what kinds of sounds you can find when databending, check out my true data 12" (stream it on soundcloud, buy the vinyl here), or download my aforementioned databending EP, dissonance is bliss, which is available for free download starting today. every sound in tracks 1-7 (aside from the vocal samples) was a file on my hard drive.
editing images in a wav editor environment
after a few years of making music out of databent sounds, i was ready to branch out, so i turned the idea on its head. instead of taking an image, converting it into sound, and making music out of it, why not process the sound, then turn it back into an image and see what happens? thus i began my first experiments with databending images, something i'm obviously still doing several years later. (though these days i do most of my bending in wordpad or with a hex editor.)
wav editors aren't the ideal image-bending environment for a number of reasons, but they do offer several unique advantages. first and foremost, they enable you to make dramatic changes using visual cues, in a way that would be difficult if not impossible in other environments.
for example, here is a typical TIF file (interleaved), as viewed in a WAV editor:
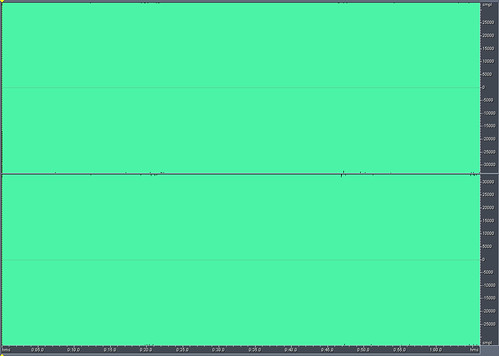
okay, that just looks like a big block of data, but if you zoom in closely at the beginning of the waveform, you can often see roughly where the header is, compared to the body of the file:

as usual, you generally want to avoid bending the header, but the body of the data is fair game (assuming you're working with bitmaps like BMP, TIF, or RAW).
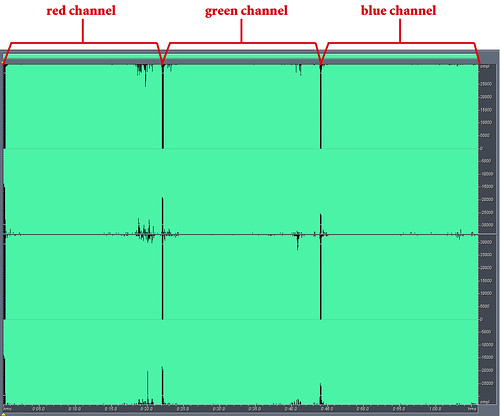
here's an image in photoshop RAW format, non-interleaved with 0 headers. sometimes (but not always), you can see approximately where each channel begins and ends:
now we can do interesting things to the data, like running the "reverse" effect. this is the effect we'd use to play a sound backwards; it reverses the order of the specified data. if we reverse the data in the TIF file, we end up with an image that's upside-down:
(note that because i missed a few pixels here, the image is off-center. if i managed to reverse all the image data, the effect would be effectively the same as rotating the canvas 180 degrees in photoshop.)
if we reverse a non-interleaved file (photoshop RAW with 0 headers), we get a similar effect, only the red and blue channels will be swapped:
of course, you can do lots more than just reverse. most wav editors come with a number of built-in audio effects that you can run on your images, not to mention plug-ins you can install. here is the RAW file after running an EQ effect on it:
note the graininess. this is common when running audio effects on image data—a highly destructive form of editing. i'm not a big fan of the graininess, which is why i don't do this much any more (some old experiments are here and here). but maybe you are, or maybe you have the some cool effects that i don't. (i used to have a great one called acoustic mirror.)
what i much prefer doing is cutting and pasting. for one thing, cut-and-paste is one of the few audio effects that will work on volatile file formats like JPG, PSD, or PNG. (most audio effects will cause these files to break, and even cut-and-paste will break your files if you do it in the wrong place, or if the size of your bent file is even one byte over/under the original.) but also, it's a pretty cool effect. here's just a taste of what you can do with bitmap files and cut and paste:
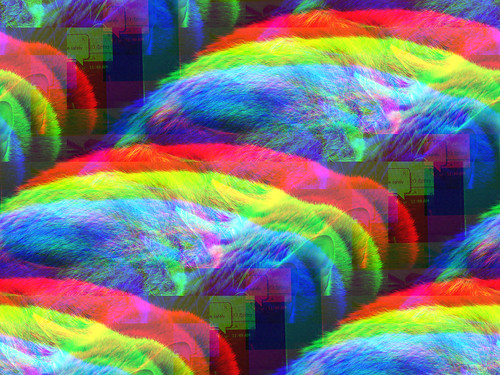
those are all super-simple bends, using only cut and paste with only one source image. you can switch it up by using multiple source images, including other effects and rotation... whatever you can imagine.
tips for editing JPG/PNG/etc in a wav editor
as i mentioned earlier, editing your image files in a wav editor is highly destructive, and most methods will immediately break files saved in volatile formats like JPG, PNG, PSD, and so on. here are a few tips for safely editing those types of files:
never bend the header. the only time i've ever found it advisable to alter a file header is when bending the color table of a file that uses indexed color (namely, GIF and 8-bit BMP). so don't do it.
don't add or subtract bytes. many image formats specify their exact size in the header, and if the actual size of the file is off even slightly, they won't open. so you must be very careful that your file has the correct amount of data. i usually do this by only using cut and paste, and always being sure to paste (once, and only once) every time i cut something to the clipboard. another way is to pay close attention to exactly how long your selection is, and make sure you don't paste too much/too little data.
try tiny cuts. even minor changes can have major effects when working with these file formats, so try making changes of just a fraction of a second, or move things around but move them just a little bit.
files that don't open in one app may open in another. photoshop isn't very good at opening corrupted JPGs. the gimp is much more flexible, as is microsoft paint. if you don't seem to be having any luck, try opening your bent files in another app. also, the same file may render differently in different applications or on different hardware. so if you have two applications that will open bent JPGs, try using both—you may get different results.
your file may still break. even if you do everything right, you may end up cutting the wrong byte or pasting it into the wrong place, making it refuse to open. just be patient and never, ever bend your originals! always, always make a copy of your image, and bend only the copy.
editing PSD files in a wav editor
all the rules from the previous section apply to photoshop's native format—PSD. but in addition to the header, PSD (photoshop) files have a patch of must-not-bend data in between each channel. furthermore, the rule for not adding/subtracting byte applies to each channel of a PSD file. since it can be impossible to tell exactly where a channel begins or ends, you should expect these files to break frequently.
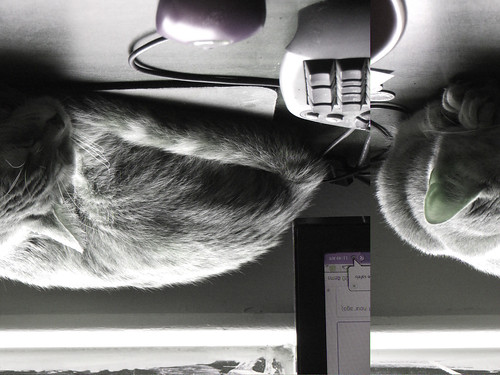
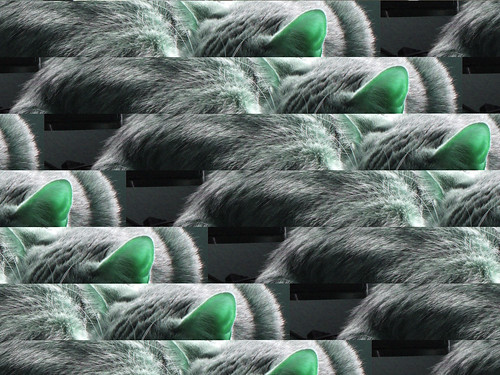
however, PSD files have features not found in most other formats, which offer some advantages. one advantage is support for layers. by editing a multi-layered PSD in a wav editor, you can glitch one layer without glitching the others. here, i've copied lily (our kitten) onto her own layer, and bent only the layer underneath:
another trick involving layers is to use duplicate layers. if you copy an image to a second layer, and then bend the file, you can effectively create two databent copies of the image, simultaneously. of course, this also gives you more opportunities to mess up and break the file.
(note that multi-layer PSD files also contain a composite layer at the end of the file, after all the other layers. this is basically a flattened version of the whole image, and is used for generating thumbnails and such. glitches made to individual layers will not be reflected in the composite layer and vice versa. if you break a layer, photoshop may still try to open the file based on this composite data. of course, each layer consists of three channels—assuming RGB color mode—so a two-layer RGB image will have a total of 9 channels, the last three being the composite layer.)
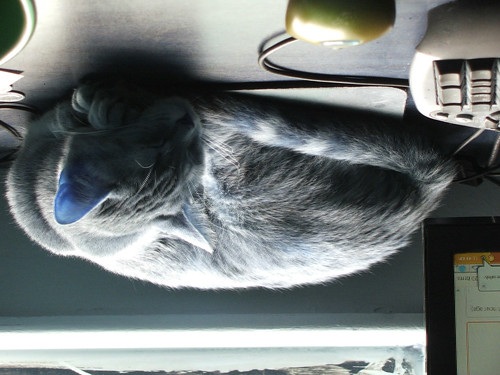
another advantage of PSD files is their extreme application sensitivity. remember how i said earlier that bent files sometimes render differently in different applications? well, bent PSD files render differently in different versions of photoshop. so here's exactly the same bent file as above, only opened in photoshop 7.0:

if that isn't weird enough, i've found that the same version of photoshop running on different hardware will render differently, and you'll even get different results from the same version running on the same hardware but on a different windows installation!
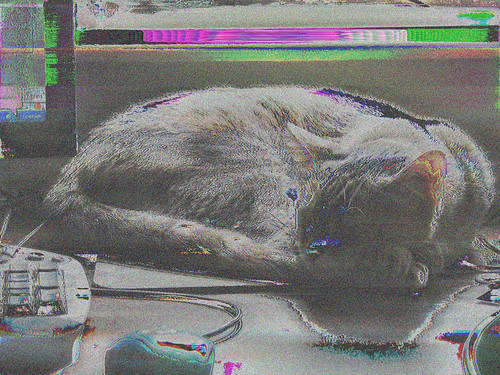
and the same file will render completely differently when opened with gimp. here's that same file again:
instead of the horizontal banding effect we see in photoshop, gimp treats bent PSD files much like a photoshop RAW file or non-interleaved TIF. (in my experience, different versions of gimp all render the same.) for this file, i made tiny cuts as mentioned above, which resulted in major changes in photoshop, but only subtle glitches in gimp.
why these applications render the same file differently is a mystery that hasn't been solved, but you can use this to become highly productive at databending. by installing multiple versions of photoshop as well as gimp, you can glitch a file once and get 3-4 databent images out of it. by glitching a multiple-layered PSD file and opening it in multiple applications, you can create 6, 9, or more databent images at once. add a second computer into the mix and you could do even more.
conclusion
so that wraps up part 2. we briefly discussed various types of sonification, and i showed you how to open your files in a wav editor and make music out of them. we then discussed databending image files using a wav editor, with some specific tips for editing PSD files.
the plan is for part 3 of the primer to be about reinterpretation—using photoshop to open non-image files, the same way we used a wav editor to open non-audio files, and stuff like that. of course, considering it took me 10 months to post part 2 after posting part 1, it may be a long while before part 3 goes up.
have fun databending, and be sure to post in the comments if you gain any additional insights into the ideas expressed here. 

20 comments:
great work! & good to see cooledit editing ;D i've not ventured in to creating glitches but have discovered corrupted files with similar effects. one of the first produced an effect quite similar to one you included as an example in the cut & paste section, rainbow overlaps... by using an incomplete download of an image file (only the header and a small portion of the top of the image were complete) - i believe it was JPG, i was able to open it in Photoshop (miraculously). because it lacked data for completing the image it would be blank... that is, unless i were to open Other images in Photoshop, in which case these other images would be interpolated by Photoshop to "fill in" the missing area found in the incomplete/corrupted JPG image file and producing all types of strange rainbow overlays. this could continue endlessly, as i drop more files in, they became part of the Photoshop cache, and effected the resulting images displayed as substitute for corruption (after a Minimize - Maximize to "refresh" the image content)... hopefully i'll share these Y2K experiments online someday with yall. see you in the glitchy pages,
mikrosopht
ben: are you using photoshop 6?
i think daniel temkin has written about the effect you're discussing.
hey stallio :) yep, looks like a variation on that! that's cool, thanks for pointing me to it. Yes, it was either with Photoshop 5 (i think) but possibly 6. I use 7 now but this gives me reason to consider reverting!
I only really have access to audacity at the moment. Do you know how to save the file back as a bmp?
assuming you opened the file in the manner i described, all you need to do is click "save".
In audacity if you press ctrl+s it tries to save it as a project (.aup). I can't see a simple 'save' option. Any thoughts.
I'm on Ubuntu, so trying to find alternatives to the programs you mention. little luck so far
hmm...
i guess you could try "export as WAV" and then manually change the file extension to BMP. it might not work, but that may be your best shot in audacity.
Nah, doesn't work, but thanks for the suggestion!
I'm gonna try Ardour some other software. Will let you know what works
Success! https://gna.org/projects/mhwaveedit/ Works perfectly! When saving just use RAW PCM as the format. The program is available in the ubuntu repository.
I didn't have the patience to configure Ardour to work, but well worth a try still
GREAT WORK! Thank you!
I have a problem though, I am using Goldwave, I tried opening (TIF, BMP) files and I added the min. number of effects, yet the file still wont open even on Paint.
what am I doing wrong?
it's hard to say, but my guess would be that you're bending the header or something else that shouldn't be bent. just keep trying is the only advice i can really give.
It does work in audacity ^_^. You can export to a music file type that's not AUP, such as WAV or OGG. I have proof: http://plunder.com/174188ee16
Oh, rats. I'm going to have to find another audio host. Can anyone tell me where is the audio host?
I'll post the music link again when I have one.
Hi I'm currently using sonification in Goldwave for an art project on corrupting 3d modelling images. I've been using it for a month now but suddenly the software has started to automatically interpret the images as stereo audio files instead of mono and won't let me save them in their original format. Do you know why this is?
i haven't used goldwave in a while... i would check your application settings to set your defaults to mono, and if that doesn't work, try uninstalling & reinstalling.
I've been testing it out some more and it seems to only happen with very specific files with not any real connection between them. For example I exported 2 identical tifs from photoshop, one with layers and one without, and the one with layers is interpreted as stereo even though other layered Tif files have worked. Also I made the default assumption for TIFs mono but it still puts my image into stereo(this is after about a half an hour of stalling on the program though) Do you think theres other factors that could be affecting this like colours, lightness or alpha channels?
I fixed the problem so if anyone finds their images are coming out in goldwave as stereo or not opening you need to just the shape of your images. Cropping or adding extra space on the sides in the photoshop will get it working again
This was really helpful. Thanks for this. I have a question though, how come all my images turn out black & white in audacity?
Hey, man, just relating my first experience with sonification: I ignored your advice on preserving the byte-size of the image and put lots of effects. It really went wrong at first, but I figured a way out:
In PSC5, when opening a RAW, you can put a slightly smaller resolution. Photoshop will state the image resolution is smaller than the file size, but will let you "Open Anyways".
If the error is the contrary (resolution bigger than file size), just keep shrinking, switch to 8-bit, etc. At some point you'll be able to open it and the image is there. If you put a non-proportional resolution (say you make an 800x600 into a 1000x240), a new distortion happens. ;)
Thanks for this tutorial! Really amazing! :)
Post a Comment