databending is, in essence, the artistic misuse of digital information. the term is inspired by the similar art of circuit bending; you could say that databending is like circuit bending with no circuits. the term is used most frequently in the context of electronic music (primarily glitch music).
the most common types of databending are:
- reinterpretation—converting a file from one medium to another (say, converting an executable file into an image file) or from one file format to a dissimilar format)
- sonification—the reinterpretation of non-audio data into audio data—probably the most common form of databending
- forced errors—forcing an application or piece of hardware to fail in the hopes that it will behave unexpectedly or the data will corrupt
- incorrect editing—editing a file using software/hardware intended for a different form of data; say, editing non-text files in a text editor
glitch art is visual art that involves or is caused by digital glitches or errors. (there's some debate over this, but for our discussions, we won't include art that simply "looks glitchy"; it has to involve real glitches.) not all glitch art is databent; sometimes it occurs naturally. hardware and software fail all the time, occasionally creating glitch art. but that depends on chance. let's talk about creating glitches on purpose—using databending techniques to create glitch art.
the wordpad effect:
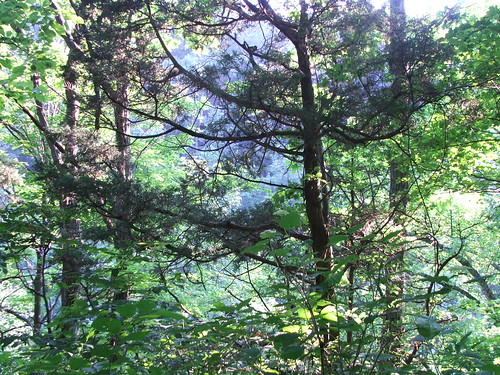
the wordpad effect is a simple glitch effect i discovered a couple years back, with the help of my readers. here's how it works: you take a digital photo like this:
[note: all images in this primer are hosted on flickr. click the images to go to flickr, and to see larger versions.]
all you do is trick microsoft wordpad into opening the file (it's really easy). then, after the file is open, you click save. that's it! the file is now glitched:
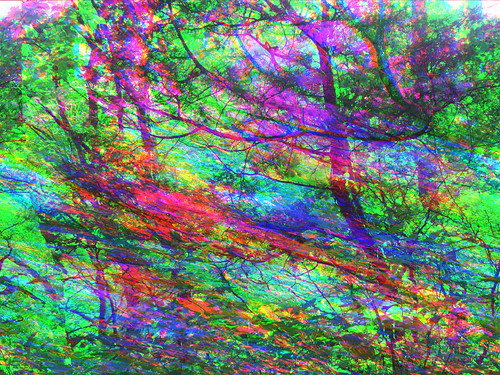
pretty dramatic results, eh? is it really that simple? well, almost. if you're thinking there has to be a catch, you're right, but it's not a big one.
the catch is this: the wordpad effect generally only works on certain types of image files. specifically, it only tends to work on uncompressed bitmap files—the formats i use are BMP, TIF, and my favorite, photoshop RAW. if you try to use the wordpad effect on a compressed image file, such as a JPG or PNG file, the file will most likely break. this is because the wordpad effect is highly destructive—it often adds lots of glitches—and file compression tends to make files fragile—difficult to glitch without breaking. in compressed files, each bit is important, so even a tiny glitch in the wrong place can have a major effect. we'll use that to our advantage in part 3 when we glitch JPGs, but for now, let's avoid compressed files.
how to do it, step by step:
first, find an image file you want to glitch. make sure you know exactly how large it is, in pixels. my fiancée's camera takes pictures that are 2272x1704 pixels by default, so that's the size i'll be working with. your image is probably a different size. write down this info if you think you might forget it. i'm going to use this image:
make a copy of your image file. important: never, ever glitch your original images! always, always make a copy of the file and make sure you're glitching the copy and not the original. if you glitch your original and break it, your photo will be gone forever! so don't glitch your originals! ever! i cannot stress this enough.
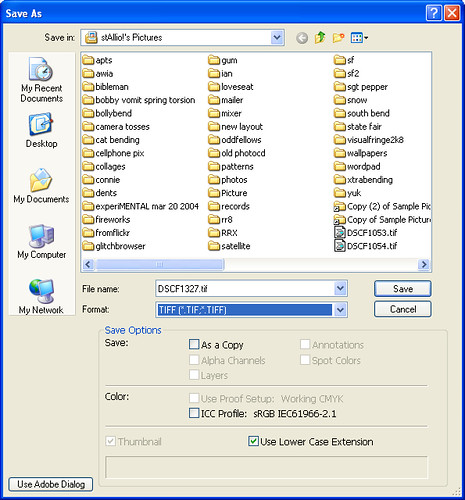
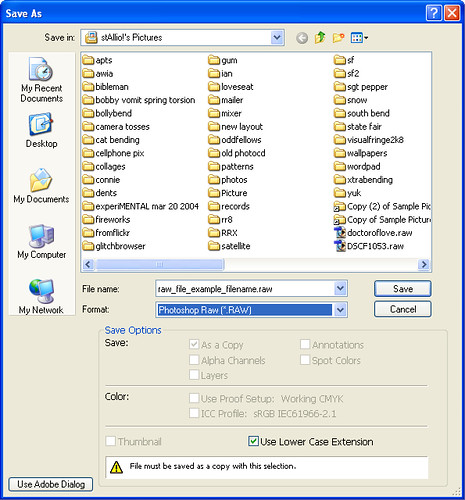
make sure your image file is in one of these file formats: BMP, TIF, or photoshop RAW. if it's not, you can change the format using the "save as" command in pretty much any image editor:
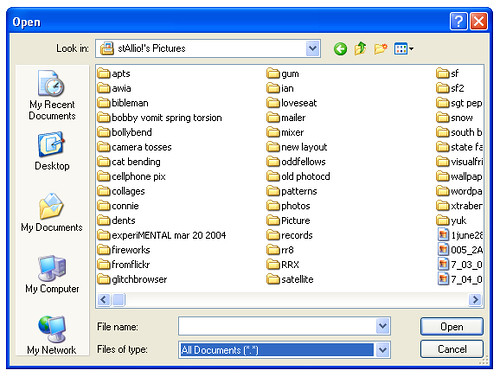
open up microsoft wordpad. you can find it in the start menu under "applications". wordpad is a mini text editor that comes free with microsoft windows. its main function is to provide rich text formatting and to allow users who don't have microsoft word to open word files. if you have word, wordpad is pretty much useless... except for databending.
in wordpad, go to the file menu and click "open". at the bottom of the "open" dialog box is an option called "files of type". select "all documents (*.*)" for the file type. you may now choose your image file and open it.
(a common misconception of first-time databenders is thinking that they need to manually change the file extension of their files in order to open them in an "incorrect" application. generally, the way to do it [in windows] is to save the file normally, and then change the "files of type" setting in the target app to either "all documents" or "raw".)
wait for a moment while wordpad loads and formats the file. you have successfully convinced wordpad that your image file is a text file, and it will diligently try to reformat your file to fit the screen, changing straight quotes into "smart" or curly quotes, adding line breaks, and stuff like that. this formatting is what actually causes the glitches in your image, and the process may take a few seconds if the file is large. if the file is really big, it might even appear to hang, but just leave it alone and it should eventually finish (or on rare occasions, wordpad will crash and close, in which case you should try a different file).
after the file has fully loaded, go to the file menu and click "save".
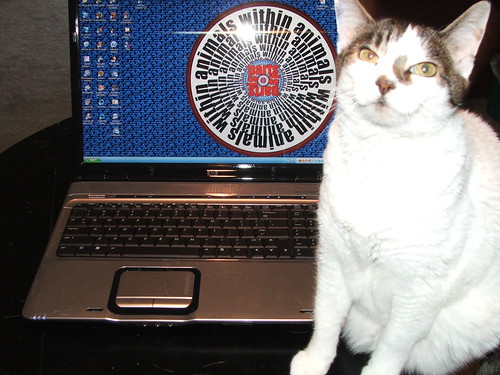
go into the image editor of your choice and try to open your databent file. you may be prompted to enter the height and width for the image (which is why i told you to write it down earlier). my image looks like this:
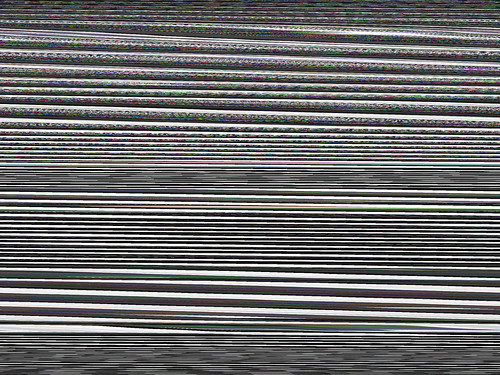
you might get an error message—or several. click OK. eventually, you may find that your file won't open. it's possible that wordpad has broken the file—as i said, the wordpad effect is highly destructive, and sometimes it even breaks bitmaps. if so, try again using a different file format or a different image. on the other hand, it's also possible that your image editor is too sensitive about opening files with errors; try opening the file in microsoft paint, instead. if it won't open in paint, the file is probably fried.
the image above is a TIF file. let's try again with a BMP:
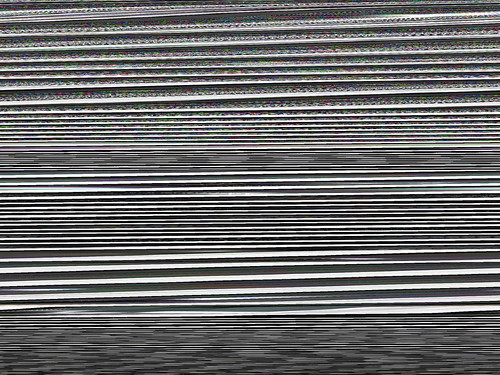
at this point, you may be looking at these two images (or your own, if following along at home) and thinking that they fall short compared to the example i showed earlier. that earlier example was full of bright, vibrant colors, while these are far more grey. what gives? the difference between that first example and these two is that the latter files are interleaved and the first example was not.
interleave vs non-interleave:
interleaving is a method of storing data in a non-contiguous manner. in this context it refers to the way that the file stores color information. your bitmap file most likely uses RGB color mode. this means that color values are stored as a combination of red, green, and blue. because the file is uncompressed, the file lists the color value for every pixel in the image. the interleaving refers to what order these pixel values are stored in.
if an image file is interleaved, the color values are stored in RGB order, one pixel at a time, like this: RGBRGBRGB... the bitmap data in the file (which comes after the header) will be basically just one long block of RGB values—for TIFs, they're stored from top-left down, and for BMPs, they're stored from bottom-right up. (BMPs are also stored in BGR order rather than RGB.) so, if you were to, say, insert two bytes of data near the beginning of the bitmap data, right before the R value, it would then "push" the other pixels over, and the R would become G, and so on. this way, you can easily create RGB color shifts in bitmaps, where reds become greens, greens become blues, and blues become reds. you may see a lot of these in your databent interleaved images.
on the other hand, if the file is not interleaved, the color information is saved as three color channels, one each for red, green, and blue. each channel is basically a grayscale image, and the bitmap data in the file stores the entire red channel, then the entire green channel, and finally the entire blue channel. when you run the wordpad effect on a non-interleaved file, each channel gets its own unique glitches, and the channels come out of alignment with each other, which can lead to some stunningly colorful bends.
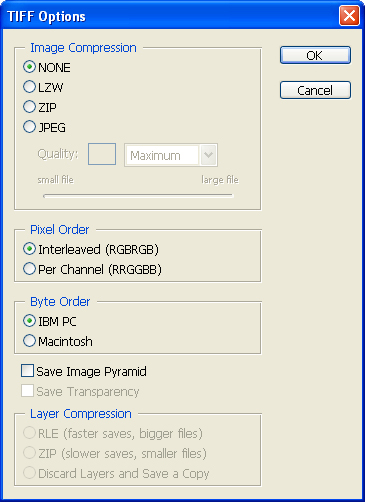
so how do you create non-interleaved bitmaps? the BMP file format doesn't allow it; BMPs are always interleaved. in the TIF file format, interleave is optional, so you can choose whether your TIFs use interleaving (default is yes)... if your software supports it. a lot of image software doesn't support non-interleaved TIF files; i don't think any of the applications that come with windows do, nor does the popular (and free) GIMP editing suite. adobe photoshop does support non-interleaved TIFs:
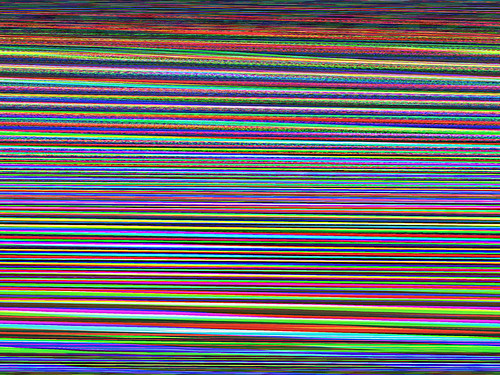
so here is my image, as a non-interleaved TIF, run through wordpad:
then again, if you have adobe photoshop, you might be better off with the photoshop RAW format, which is possibly my favorite format for bending.
photoshop RAW format:
photoshop RAW format is a proprietary raw image format available in adobe photoshop. as far as i know, no other application can open these files, which have an .RAW file extension. so if you don't have photoshop, you can't use this format (though your image editor may have its own similar format; you never know).
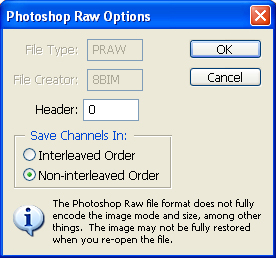
what makes this format so great is its flexibility. not only can you choose whether or not to use interleaving, but setting the number of color channels is as easy as typing in a number. this allows you to work with grayscale files and CMYK color (though my experiments with CMYK have been underwhelming). and perhaps best of all, this format allows you to create files with zero headers that are impossible to break!
pretty much every file on your computer has a file header containing various data, such as what type of file it is, how large it is, and so on. most of the time, you need to carefully avoid bending the file header, because corrupting the header is the easiest way to break the file (with rare exceptions). photoshop RAW format allows us to avoid dealing with headers at all, simply by typing 0 into the header box. if you have a RAW file with no header, you can do just about anything you want to it—bend it in any way you can imagine—and it will still open.
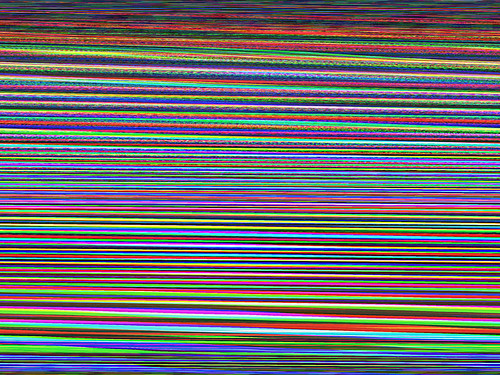
i've now resaved my source image as a non-interleaved raw file with no headers. let's see what happens when i run it through wordpad and then try to reopen it in photoshop:
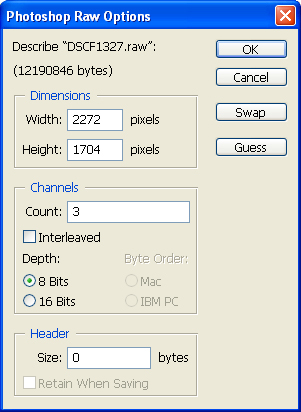
since we saved the file with no headers, photoshop has no way of knowing anything about this image. sometimes it is able to guess the size settings based on how large the file is, but most likely it will guess wrong. so when using this format, it's essential that you make a note of your image's exact pixel dimensions before bending it. in this case, as i said earlier, the image is 2272x1704 pixels, the file is not interleaved, and the number of color channels is 3 (for RGB). here's what the image looks like after running it through wordpad:
looks a lot like the non-interleaved TIF, doesn't it? the two formats are pretty similar, so aesthetically you won't notice a whole lot of difference between bent RAW files and bent TIF files that use the same settings. the biggest difference is that you can break TIF files by corrupting the header.
so that's the wordpad effect. you might note that the images in the tutorial are far more heavily glitched than the example at the top of the post. how heavy the glitching gets depends on your source image. sometimes, you'll even get images that don't bend at all! the pattern behind this is a mystery... let me know if you crack it.
note also that after you've run an image file through wordpad once, running it through a second time has no effect. that's because wordpad has already reformatted the file to its liking. if you want to use the effect on the same image multiple times, you'll need to alter the data somehow in between passes, for example by saving the image to a new file. another interesting variant is to flip the databent image horizontally, and then run the flipped image through wordpad—i call this reverse wordpad.
that's it for part 1 of this primer. if you're on windows, you should now know enough to apply the wordpad effect to all your images. if you're not on windows, the information should still come in handy for glitching bitmap files. and even if you're already a databender, hopefully you've learned something.
in part 2, i'll discuss sonification and making music out of the files on your hard drive. then in part 3, i'll come back to glitch art and talk about bending JPG files. 

40 comments:
Very nice work on this primer, st!
Just for fun, I tried a quick experiment where I saved a master file (in this case, a "Barnsley" fractal) as 16-bit, 24-bit and 32-bit BMPs and "WordPadded" them all. The 16-bit BMP yielded no difference at all, and the 24-bit BMP (which I think is GIMP's default) had that cool grayscale funhouse effect with horizontal scanlines and occasional patches of "noise". The 32-bit BMP, though, turned out really nice.
I posted them here.
Thanks for this - very helpful. I'm on Linux - and, just for reference - Open Office tries to be smart and places the BMP image in your document. AbiWord seems to attempt to open the file - but I wasn't patient enough to wait through it.
I ended up opening up the bitmap in vim and experimenting with global search/replace. I also played with ghex (gnome hex editor).
It was a fun tangent taken thanks to your post....
http://flickr.com/photos/thn/2768863243/
I've found that Wordpad does at least two things to a binary file; it replaces byte 07 (ascii: BEEP) with a space , and it replaces every lonely 0A or 0D (line feed and carriage return respectively) and also 0B (vertical tab) with the bytes "0A 0D". So the rate of glitching is probably dependent on how dark the picture is, since low bytes like these give dark pixels (i suppose).
This also explains why arratik got different results for different file types. I didn't test 32-bit BMP's, but I did test 24-bit, 8-bit, 4-bit and 1-bit BMP; I found tons of 07, 0A, 0B and 0D in the 24-bit as well as the 8-bit version; bending these resulted in quite nice bends in which the original picture (your cat photo) was not recognizable. The 4-bit version only got a nice color shift; the b/w became red and got some small glitches. This has to do with byte frequency; the 24-bit and 8-bit versions have lots of possibilities for every pixel, while the 4-bit and 1-bit versions had much less chance to incidentally get pixels that were 07, 0A, 0B or 0D. Also: large chunks of black or white (as in the cat photo) get zeros and "ÿ"s respectively, neither of which are bytes Wordpad will affect.
thank you so much for this, I have been searching the internet for a while for something like this and found nothing until now.
Whenever I try the wordpad effect or opening and exporting an image as a .raw from audactiy, my pictures always come out in grayscale. This happens even if I simply export a picture as a .raw then open it in photoshop without doing anything to it. I've gotten some really cool effects which I think would look great with color. So far I've tried .raw, non-interleaved bitmaps and TIFF's and I'm using Photoshop CS3 version 10. Could it have something to do with the way that I'm saving or opening the pictures in photoshop? I have basically no knowledge of photoshop so I'm not too sure what it couold be.
Thanks.
austin: my guess would be that the problem is with audacity. others have reported problems with databending and audacity.
It's not only Audacity though. It does the same with wordpad or even if I simply save and reopen a .raw in photoshop without doing anything to it. I'm assuming that it might have something to do with my lack of photoshop skillz.
I've made somehting similar but for jpeg's http://www.larsby.com/johan/?p=376
funny, I've opened a tif file in wordpad and then saved and... nothing happened :D now will try with messing actual data (btw found great way to remove photoshop name from file header :D)
anon: someone may have mentioned this above, but the amount of white or light-colored pixels has a major impact here. if your tif didn't bend, it was probably too dark.
I've been messing with wordpad for a while but I haven't been able to get it to glitch. Is there a problem in my method or is it my computer?
First I open the picture in paint. i make it smaller and then save it as a tiff. I then go into wordpad and open it up. it takes a second to load and then a long code appears. I press save instead of save as so that it stays in the tiff form. I then go into paint, find the file, and try to open it. A warning box comes up saying that it is not a correct bitmap file and it can't be opened. This is as far as I have gotten and I have had no positive results.
Any help?
my guess would be that your headers are getting bent. this happens sometimes. just keep trying with different images, or try BMP instead of TIF.
I think you were right because I just got it to work. Thanks for the tutorial.
Muchas GRacias por las explicaciones!
Son muy utiles
Saludos
Thanks for that. Very useful to me as I like to convert the result to sound, but that's another subject.
Cheers!
indeed... that's the subject of part 2!
For some reason the wordpad effect doesn't work for me. All I do is open a BMP in it, save it as a BMP, then try to open it. It doesn't work. Help!
usually the problem is that your source image doesn't have any pixels with those particular colors of gray. try BMPs with a higher bitrate or just try a different source image.
Interesting. I cannot achieve this effect with wordpad. When I open the file and try to save it without editing anything, wordpad just crashes automatically.
The only thing I've managed to do was open a .png in notepad++ and edit some stuff but all I could manage to get was a blue line to appear on the image, more editing just destroyed the file.
No matter what id do i have it saved as a Bmp but it still breacks it. What am i doing wrong?
your source image is most likely the problem: it has characters in the header that are being altered and breaking the file.
you could try using TIF instead of BMP, and if that's no good then just try a different picture.
well .tif dosent work either. tryed three difrent pics. it just wont view them
another possibility is that you're using the wrong application to open the bent files. try paint.
im getting this error With paint:
C\users\owner\Desktop\PinkiePie2.Tif
Paint cannot read This File
this is not a valid Bitmap(?) file or its file format is not currently supported.
your headers are getting corrupted for some reason. this could be because of some idiosyncrasy of the image (color composition, etc), the application used to create the source image, or the settings used to save the file.
wordpad options for mac?
there are surely ways to create this effect on a mac (by writing a script, or maybe by changing the character encoding and resaving), and you could get a similar effect in any editor by search & replace. but i can't recommend a mac program that is crappy in the same exact way as notepad; i doubt such a program exists.
hello Benjamin,
<in your recents glitches you' ve got a great advance making than a part of image be glitched and the rest don't. It's wonderful How this can happen
Very pleased with your works
Thank you
Hey there,
I've just been looking at the reddit glitch-art subreddit which has a link to this as I'm planning to give it a go - don't no if you remember notv...
http://norobotmonstertv.wordpress.com/
I've recently gotten into databending. I was wondering what you thought of my images so far, there all from photos I took myself
check them out here:
http://bendingdata.tumblr.com/
I recently got into data bending.
Here's some of my stuff so far: http://bendingdata.tumblr.com/
hey! thanks for the tutorial, im having problems with it though, ive tried tiff and bmp and i cant open them after glitching them in wordpad, they are always corrupted, i tried opening them in every image software i have but to no avail, thanks in advance if you can answer me
thanks for your explanations, some of the commentaries up here are pretty informative too. now i see your playlist of throbbing gristle, i feel in the right place. cheers
LY: thank you for the tutorial! :)
played with this on a mac with text edit and it worked similarly. cool.
This is sick! I just learned about image glitching, and my wordpad is shreddin' and making shit look way cool! Thanks for the post!
Here in 2025. Just to read up. 17 YRS LATER CAN YOU IMAGINE WERE ARE STILL WAVERING THE BITS
The article offers a clear and insightful introduction to databending as both a التقنية and an artistic philosophy, effectively demystifying how intentional manipulation of digital files can produce unpredictable yet compelling visual outcomes. By explaining accessible methods like editing image data in non-native programs (such as text or audio editors), it highlights how glitch art transforms “errors” into a creative language that reveals the hidden structure of digital media . Overall, the primer stands out as a practical and thought-provoking guide that not only teaches technique but also reframes technological imperfection as a powerful tool for experimental digital expression.
[url=https://flowmind-agency.com/blog/outsource-digital-marketing]digital marketing outsourcing company[/url]
golang development services
ia text detector
Post a Comment